RIQELO FACTIONS · QUEST GUIDE
Awakening of a Companion
Follow the journey from the first spark to your own agathion. Find every chapter’s objectives, materials and turn-in requirements below, and expand the section you need.
- Chapters
- 14
- Scenes
- 60
- Chosen reward
- 1 agathion
Start your journey
Complete chapters 1–11 on your main class. The two subclass trials, chapters 12 and 13, unlock after turning in chapter 5.
Get your diary
The quest starts automatically for a new character. If your character was created earlier, speak to Anakazel in Gludio.
Open Inventory → Quest and double-click Awakening Diary. The diary shows your current scene, collected items and the requirements to continue.
Find Anakazel
Find your next objective
Press Alt+U, select the quest and enable the quest location checkbox. Then open Awakening Diary and choose Track objective. Follow your current scene: after collecting the items, you may still need a level, a class transfer or a conversation with an NPC.
Quest chapters
Expand a chapter to see all its scenes. Material quantities are totals for the chapter.
01The One Who ListenedMain class: start 1+, turn-in 10+
The quest, stone and diary are granted when your character is created. Complete the opening scenes and turn in the chapter to Anakazel in Gludio on your main class at level 10.
What to collect
 Awakening Spark ×12
Your race’s starting region; follow the quest marker for the exact location.
- Scene 1
A Warm Stone
From level 1. Read the opening entry about the stone and the companion’s voice. Open Awakening Diary: Inventory → Quest → double-click the diary. Choose Continue.
- Location
- The companion’s diary; open it anywhere.
- Complete when
- Completing this action unlocks the next objective.
- Scene 2
The First Spark
From level 1. Collect sparks from ordinary monsters in your race’s starting region. Choose Track objective and follow the marker. Collect 12 × Awakening Spark while this objective is active. Then open Awakening Diary and choose Continue.
- Location
- Your race’s starting region; follow the quest marker for the exact location.
- Complete when
- Finish the collection step with Continue. The items remain until chapter turn-in.
- Scene 3
A Trace on the Ground
From level 4. Find the former keeper’s trace beyond the starting area. Choose Track objective and follow the marker. At the marker, open Awakening Diary and choose Examine the site.
- Location
- Your race’s starting region; follow the quest marker for the exact location.
- Complete when
- Completing this action unlocks the next objective.
- Scene 4
The First Promise
From level 7. Read the companion’s request and continue towards Gludio. Open Awakening Diary: Inventory → Quest → double-click the diary. Choose Continue.
- Location
- The companion’s diary; open it anywhere.
- Complete when
- Completing this action unlocks the next objective.
- Scene 5
A Letter in Gludio
From level 10. Show the stone to Leader Anakazel Mid. Choose Track objective, approach the NPC and choose Continue conversation in their quest dialog.
- Location
- Leader Anakazel Mid — Gludio (-14814, 123589, -3112)
- Complete when
- Complete the scene, then choose Complete chapter with Leader Anakazel Mid once chapter 1 requirements are met.
02The Missing MessengerMain class: start 10+, turn-in 20+
Investigate Ruins of Agony, gather dust and free Maren. Turn in to Anakazel on your main class at level 20.
What to collect
 Tainted Bone Dust ×18
Ruins of Agony (-57472, 111732, -3124); Ruin Zombie, Ruin Zombie Leader
- Scene 1
A Name on the List
From level 10. Ask Anakazel about the missing messenger Maren. Choose Track objective, approach the NPC and choose Continue conversation in their quest dialog.
- Location
- Leader Anakazel Mid — Gludio (-14814, 123589, -3112)
- Complete when
- Completing this action unlocks the next objective.
- Scene 2
An Interrupted Route
From level 14. Investigate where the messenger’s trail ends. Choose Track objective and follow the marker. At the marker, open Awakening Diary and choose Examine the site.
- Location
- Ruins of Agony (-57472, 111732, -3124)
- Complete when
- Completing this action unlocks the next objective.
- Scene 3
The Foreign Seal
From level 14. Collect dust from the local undead to break the seal. Choose Track objective and follow the marker. Collect 18 × Tainted Bone Dust while this objective is active. Then open Awakening Diary and choose Continue.
- Location
- Ruins of Agony (-57472, 111732, -3124); Ruin Zombie, Ruin Zombie Leader
- Complete when
- Finish the collection step with Continue. The items remain until chapter turn-in.
- Scene 4
Bring Maren Back
From level 17. Free Maren by defeating the two seal guards. Choose Track objective and follow the marker. At the marker, open Awakening Diary and choose Start event. Stay nearby; the event lasts up to five minutes.
- Location
- Ruins of Agony (-57472, 111732, -3124)
- Complete when
- The scene completes automatically after the last enemy. If interrupted, restart the event; your earlier collection is preserved.
- Scene 5
The Witness Returns
From level 20. Give Maren’s testimony to Leader Anakazel Mid. Choose Track objective, approach the NPC and choose Continue conversation in their quest dialog.
- Location
- Leader Anakazel Mid — Gludio (-14814, 123589, -3112)
- Complete when
- Complete the scene, then choose Complete chapter with Leader Anakazel Mid once chapter 2 requirements are met.
03The Nameless OrderMain class: start 20+, turn-in 30+
Find the order in Abandoned Camp. Turn-in with Anakazel in Gludio requires your main class at level 30+, the first class transfer and a selected S-grade weapon plan. Select your weapon before turning in the chapter; the choice is permanent. Anakazel will send you to Giran for the next chapter.
What to collect
 Raider Mark ×24
Abandoned Camp (-44582, 141570, -2858); Ol Mahum Patrol, Ol Mahum Guard
- Scene 1
The Brokers' Camp
From level 20. Investigate the marked lookout in Abandoned Camp. Choose Track objective and follow the marker. At the marker, open Awakening Diary and choose Examine the site.
- Location
- Abandoned Camp (-44582, 141570, -2858)
- Complete when
- Completing this action unlocks the next objective.
- Scene 2
Courier Marks
From level 21. Collect courier marks from Ol Mahum. Choose Track objective and follow the marker. Collect 24 × Raider Mark while this objective is active. Then open Awakening Diary and choose Continue.
- Location
- Abandoned Camp (-44582, 141570, -2858); Ol Mahum Patrol, Ol Mahum Guard
- Complete when
- Finish the collection step with Continue. The items remain until chapter turn-in.
- Scene 3
My Own Path
From level 25. Read the conversation about your chosen profession. Open Awakening Diary: Inventory → Quest → double-click the diary. Choose Continue.
- Location
- The companion’s diary; open it anywhere.
- Complete when
- Completing this action unlocks the next objective.
- Scene 4
An Ally in Giran
From level 30. Show the order to Anakazel in Gludio: he will direct you to Sidereal Archers in Giran for the next chapter. Obtain the first class transfer on your main class by any method and choose an S-grade weapon in the quest menu before turning in the chapter. This choice is permanent. Choose Track objective, approach the NPC and choose Continue conversation in their quest dialog.
- Location
- Leader Anakazel Mid — Gludio (-14814, 123589, -3112)
- Complete when
- Complete the scene, then choose Complete chapter with Leader Anakazel Mid once chapter 3 requirements are met.
04A Forgotten LanguageMain class: start 30+, turn-in 40+
Collect Breka totems and protect the first ritual. Turn in to Sidereal Archers in Giran on your main class at level 40.
What to collect
 Breka Totem Fragment ×30
Breka's Stronghold (79006, 121244, -2220); Breka Orc, Breka Orc Warrior
- Scene 1
The Interpreter
From level 30. Speak to Sidereal Archers about the two voices within the stone. Choose Track objective, approach the NPC and choose Continue conversation in their quest dialog.
- Location
- Sidereal Archers — Giran (82562, 144211, -3528)
- Complete when
- Completing this action unlocks the next objective.
- Scene 2
Words of the Totem
From level 31. Collect totem fragments from Breka Orcs. Choose Track objective and follow the marker. Collect 30 × Breka Totem Fragment while this objective is active. Then open Awakening Diary and choose Continue.
- Location
- Breka's Stronghold (79006, 121244, -2220); Breka Orc, Breka Orc Warrior
- Complete when
- Finish the collection step with Continue. The items remain until chapter turn-in.
- Scene 3
The Broken Circle
From level 35. Investigate the ancient broken-circle mark. Choose Track objective and follow the marker. At the marker, open Awakening Diary and choose Examine the site.
- Location
- Breka's Stronghold (79006, 121244, -2220)
- Complete when
- Completing this action unlocks the next objective.
- Scene 4
The First Shared Ritual
From level 38. Protect the first ritual: defeat three successive waves of one enemy each. Choose Track objective and follow the marker. At the marker, open Awakening Diary and choose Start event. Stay nearby; the event lasts up to five minutes.
- Location
- Level 38–40 hunt (71361, 125970, -3648)
- Complete when
- The scene completes automatically after the last enemy. If interrupted, restart the event; your earlier collection is preserved.
- Scene 5
The Price of an Order
From level 40. Return to Sidereal Archers and report the ritual’s outcome. Choose Track objective, approach the NPC and choose Continue conversation in their quest dialog.
- Location
- Sidereal Archers — Giran (82562, 144211, -3528)
- Complete when
- Complete the scene, then choose Complete chapter with Sidereal Archers once chapter 4 requirements are met.
05A Debt to the LivingMain class: start 40+, turn-in 50+
Investigate the caravan’s trail in Timak Outpost. Turn-in with Alfred requires your main class at level 50+ and the second class transfer. Turning in this chapter unlocks both parallel subclass trials; begin each one on its respective active subclass at level 40+.
What to collect
 Timak Warrior Mark ×30
Timak Outpost (72619, 80743, -3454); Timak Orc, Timak Orc Archer, Timak Orc Soldier
- Scene 1
Alfred's Confession
From level 40. Speak to Alfred about the caravan carrying the stones. Choose Track objective, approach the NPC and choose Continue conversation in their quest dialog.
- Location
- Alfred Von Helmann — Oren (79399, 52971, -1552)
- Complete when
- Completing this action unlocks the next objective.
- Scene 2
The Caravan Trail
From level 42. Investigate the missing caravan’s trail in Timak Outpost. Choose Track objective and follow the marker. At the marker, open Awakening Diary and choose Examine the site.
- Location
- Timak Outpost (72619, 80743, -3454)
- Complete when
- Completing this action unlocks the next objective.
- Scene 3
Corroboration
From level 44. Collect Timak warrior marks to check the caravan’s seals. Choose Track objective and follow the marker. Collect 30 × Timak Warrior Mark while this objective is active. Then open Awakening Diary and choose Continue.
- Location
- Timak Outpost (72619, 80743, -3454); Timak Orc, Timak Orc Archer, Timak Orc Soldier
- Complete when
- Finish the collection step with Continue. The items remain until chapter turn-in.
- Scene 4
Responsibility
From level 50. Return to Alfred with the second class transfer on your main class, obtained by any method. Choose Track objective, approach the NPC and choose Continue conversation in their quest dialog.
- Location
- Alfred Von Helmann — Oren (79399, 52971, -1552)
- Complete when
- Complete the scene, then choose Complete chapter with Alfred Von Helmann once chapter 5 requirements are met.
06My Memories Are MineMain class: start 50+, turn-in 55+
Read the memory through Harit scales. Turn in to Embryo in Ivory Tower on your main class at level 55.
What to collect
 Memory Scale ×24
Forest of Mirrors (137328, 94316, -3426); Harit Lizardman, Harit Lizardman Grunt, Harit Lizardman Archer
- Scene 1
The Researcher's Mistake
From level 50. Ask Embryo for a safe way to read the memory. Choose Track objective, approach the NPC and choose Continue conversation in their quest dialog.
- Location
- Head Instructor Embryo — Ivory Tower (85129, 16195, -4272)
- Complete when
- Completing this action unlocks the next objective.
- Scene 2
Mirror Scales
From level 50. Collect Harit scales in Forest of Mirrors. Choose Track objective and follow the marker. Collect 24 × Memory Scale while this objective is active. Then open Awakening Diary and choose Continue.
- Location
- Forest of Mirrors (137328, 94316, -3426); Harit Lizardman, Harit Lizardman Grunt, Harit Lizardman Archer
- Complete when
- Finish the collection step with Continue. The items remain until chapter turn-in.
- Scene 3
Someone Else's Last Day
From level 52. Examine the stone’s reflection at the marked location. Choose Track objective and follow the marker. At the marker, open Awakening Diary and choose Examine the site.
- Location
- Forest of Mirrors (137328, 94316, -3426)
- Complete when
- Completing this action unlocks the next objective.
- Scene 4
Do Not Erase the Pain
From level 54. Read the memory of the former keeper. Open Awakening Diary: Inventory → Quest → double-click the diary. Choose Continue.
- Location
- The companion’s diary; open it anywhere.
- Complete when
- Completing this action unlocks the next objective.
- Scene 5
A Record for Jolie
From level 55. Give the record to Embryo and receive directions to Jolie. Choose Track objective, approach the NPC and choose Continue conversation in their quest dialog.
- Location
- Head Instructor Embryo — Ivory Tower (85129, 16195, -4272)
- Complete when
- Complete the scene, then choose Complete chapter with Head Instructor Embryo once chapter 6 requirements are met.
07The Scribe's ArchiveMain class: start 55+, turn-in 61+
Recover the archive in The Giant’s Cave and protect the reading. Turn in to Jolie in Aden on your main class at level 61.
What to collect
 Ancient Crystal Fragment ×36
The Giant's Cave (174771, 61840, -4300); Hamrut, Kranrot
- Scene 1
The Missing Verse
From level 55. Ask Jolie about the keeper’s song and the giants’ archive. Choose Track objective, approach the NPC and choose Continue conversation in their quest dialog.
- Location
- Jolie — Aden (147454, 21315, -2136)
- Complete when
- Completing this action unlocks the next objective.
- Scene 2
Crystal Pages
From level 58. Collect fragments from Hamrut and Kranrot in The Giant’s Cave. Choose Track objective and follow the marker. Collect 36 × Ancient Crystal Fragment while this objective is active. Then open Awakening Diary and choose Continue.
- Location
- The Giant's Cave (174771, 61840, -4300); Hamrut, Kranrot
- Complete when
- Finish the collection step with Continue. The items remain until chapter turn-in.
- Scene 3
The Archive Trace
From level 59. Investigate the archive’s resonance site. Choose Track objective and follow the marker. At the marker, open Awakening Diary and choose Examine the site.
- Location
- The Giant's Cave (174771, 61840, -4300)
- Complete when
- Completing this action unlocks the next objective.
- Scene 4
Preserve the Page
From level 60. Protect the archive reading from three successive enemies. Choose Track objective and follow the marker. At the marker, open Awakening Diary and choose Start event. Stay nearby; the event lasts up to five minutes.
- Location
- The Giant's Cave (174771, 61840, -4300)
- Complete when
- The scene completes automatically after the last enemy. If interrupted, restart the event; your earlier collection is preserved.
- Scene 5
The Right to Remember
From level 61. Give the recovered record to Jolie. Choose Track objective, approach the NPC and choose Continue conversation in their quest dialog.
- Location
- Jolie — Aden (147454, 21315, -2136)
- Complete when
- Complete the scene, then choose Complete chapter with Jolie once chapter 7 requirements are met.
08Those Who Were ForgottenMain class: start 61+, turn-in 70+
Recover the echoes of names in Fields of Massacre and free the captive echo, a witness to the seal’s trials. Defeat two guards in The Last Captive scene. Turn in to Jolie on your main class at level 70.
What to collect
 Freed Echo ×30
Fields of Massacre (177621, -22760, -3256); Doom Trooper, Doom Knight
- Scene 1
The Nameless Field
From level 61. Find traces of erased names at the marked site in Fields of Massacre. Choose Track objective and follow the marker. At the marker, open Awakening Diary and choose Examine the site.
- Location
- Fields of Massacre (177621, -22760, -3256)
- Complete when
- Completing this action unlocks the next objective.
- Scene 2
Restore Their Voices
From level 63. Collect echoes from Doom Troopers and Doom Knights. Choose Track objective and follow the marker. Collect 30 × Freed Echo while this objective is active. Then open Awakening Diary and choose Continue.
- Location
- Fields of Massacre (177621, -22760, -3256); Doom Trooper, Doom Knight
- Complete when
- Finish the collection step with Continue. The items remain until chapter turn-in.
- Scene 3
The Last Captive
From level 65. Free the captive echo, a witness to the seal’s trials: defeat two guards. The scene completes automatically; speaking to the witness that appears is not required for completion. Choose Track objective and follow the marker. At the marker, open Awakening Diary and choose Start event. Stay nearby; the event lasts up to five minutes.
- Location
- Fields of Massacre (177621, -22760, -3256)
- Complete when
- The scene completes automatically after the last enemy. If interrupted, restart the event; your earlier collection is preserved.
- Scene 4
A Name Yet to Come
From level 68. Read the companion’s request about its future name and appearance. Open Awakening Diary: Inventory → Quest → double-click the diary. Choose Continue.
- Location
- The companion’s diary; open it anywhere.
- Complete when
- Completing this action unlocks the next objective.
- Scene 5
A Cracked Vessel
From level 70. Return to Jolie and report the rescue. Choose Track objective, approach the NPC and choose Continue conversation in their quest dialog.
- Location
- Jolie — Aden (147454, 21315, -2136)
- Complete when
- Complete the scene, then choose Complete chapter with Jolie once chapter 8 requirements are met.
09Stone and WillMain class: start 70+, turn-in 76+
Collect cores and temper the stone in Hot Springs. Turn in to Juris on your main class at level 76.
What to collect
 Hot Spring Core ×24
Hot Springs: level 73–74 hunt (150984, -115580, -1552); Hot Springs Bandersnatchling, Hot Springs Buffalo, Hot Springs Flava
- Scene 1
Juris' Advice
From level 70. Ask Juris to help strengthen the stone. Choose Track objective, approach the NPC and choose Continue conversation in their quest dialog.
- Location
- Juris — Hot Springs (151238, -112509, -2232)
- Complete when
- Completing this action unlocks the next objective.
- Scene 2
Living Warmth
From level 73. Collect warm cores from the beasts of Hot Springs. Choose Track objective and follow the marker. Collect 24 × Hot Spring Core while this objective is active. Then open Awakening Diary and choose Continue.
- Location
- Hot Springs: level 73–74 hunt (150984, -115580, -1552); Hot Springs Bandersnatchling, Hot Springs Buffalo, Hot Springs Flava
- Complete when
- Finish the collection step with Continue. The items remain until chapter turn-in.
- Scene 3
The Open Seal
From level 74. Start tempering the stone and protect it through three waves. Choose Track objective and follow the marker. At the marker, open Awakening Diary and choose Start event. Stay nearby; the event lasts up to five minutes.
- Location
- Hot Springs: level 73–74 hunt (150984, -115580, -1552)
- Complete when
- The scene completes automatically after the last enemy. If interrupted, restart the event; your earlier collection is preserved.
- Scene 4
Neither Master nor Prisoner
From level 76. Show Juris the tempered stone. Choose Track objective, approach the NPC and choose Continue conversation in their quest dialog.
- Location
- Juris — Hot Springs (151238, -112509, -2232)
- Complete when
- Complete the scene, then choose Complete chapter with Juris once chapter 9 requirements are met.
10A Weapon for a PromiseMain class: start 76+, turn-in 76+
Turn in to Jolie on your main class at level 76+ with the third class transfer. Claim the remaining materials for the S-grade weapon selected in chapter 3: together with earlier rewards, these form a complete kit for one 60% crafting attempt, including two recipes — one to learn and one to consume. Using the recipe requires a dwarf crafter with level 9 Create Item. Crafting the weapon is not required for this chapter or the quest finale; the reward is not a finished weapon.
- Scene 1
Gathered Along the Way
From level 76. Speak to Jolie on your main class at level 76+ with the third class transfer. Claim the remaining materials for the S-grade weapon you selected in chapter 3; there is no second selection. Choose Track objective, approach the NPC and choose Continue conversation in their quest dialog.
- Location
- Jolie — Aden (147454, 21315, -2136)
- Complete when
- Completing this action unlocks the next objective.
- Scene 2
Before the Last Journey
From level 76. Read the memory before the final stage of the journey. Open Awakening Diary: Inventory → Quest → double-click the diary. Choose Continue.
- Location
- The companion’s diary; open it anywhere.
- Complete when
- Complete the scene, then choose Complete chapter with Jolie once chapter 10 requirements are met.
11The Final RecordMain class: start 76+, turn-in 80+
Investigate the archive’s trace in The Giant’s Cave, then travel to the marker in Hot Springs and break the old seal in a personal event. Turn-in with Embryo requires your main class at level 80, 100% experience and the third class transfer. The subclass trials and Noblesse chain can be completed in parallel.
What to collect
 Mature Soul Crystal ×36
Hot Springs: level 76 hunt (150984, -115580, -1552); Hot Springs Atrox, Hot Springs Bandersnatch, Hot Springs Grendel
- Scene 1
Three Foundations
From level 76. Discuss your main class, two subclasses and Noblesse status with Embryo. Choose Track objective, approach the NPC and choose Continue conversation in their quest dialog.
- Location
- Head Instructor Embryo — Ivory Tower (85129, 16195, -4272)
- Complete when
- Completing this action unlocks the next objective.
- Scene 2
The Mature Soul's Anchor
From level 76. Collect crystals from eligible ordinary monsters at levels 74–80. Choose Track objective and follow the marker. Collect 36 × Mature Soul Crystal while this objective is active. Then open Awakening Diary and choose Continue.
- Location
- Hot Springs: level 76 hunt (150984, -115580, -1552); Hot Springs Atrox, Hot Springs Bandersnatch, Hot Springs Grendel
- Complete when
- Finish the collection step with Continue. The items remain until chapter turn-in.
- Scene 3
Sever the Old Trace
From level 77. Return to the archive’s trace in The Giant’s Cave and investigate it. Choose Track objective and follow the marker. At the marker, open Awakening Diary and choose Examine the site.
- Location
- The Giant's Cave (174771, 61840, -4300)
- Complete when
- Completing this action unlocks the next objective.
- Scene 4
Echo of the Scribe
From level 78. After investigating The Giant’s Cave, travel to the new marker in Hot Springs. Repel the Scribe’s three attempts to restore the seal in a personal event. Choose Track objective and follow the marker. At the marker, open Awakening Diary and choose Start event. Stay nearby; the event lasts up to five minutes.
- Location
- Hot Springs: level 76 hunt (150984, -115580, -1552)
- Complete when
- The scene completes automatically after the last enemy. If interrupted, restart the event; your earlier collection is preserved.
- Scene 5
Remain Yourself
From level 79. Read the companion’s words after the victory. Open Awakening Diary: Inventory → Quest → double-click the diary. Choose Continue.
- Location
- The companion’s diary; open it anywhere.
- Complete when
- Completing this action unlocks the next objective.
- Scene 6
Ready to Awaken
From level 80. Return to Embryo on your main class at level 80 with 100% experience. Choose Track objective, approach the NPC and choose Continue conversation in their quest dialog.
- Location
- Head Instructor Embryo — Ivory Tower (85129, 16195, -4272)
- Complete when
- Complete the scene, then choose Complete chapter with Head Instructor Embryo once chapter 11 requirements are met.
12Through Other EyesAfter chapter 5 · subclass 40+ · turn-in 76+
After turning in chapter 5 on your main class at level 50+, select this branch in the diary. Obtain a subclass normally, switch to it at level 40+ and bind it with Ariel. Complete every scene on it. Turn in on the same subclass at level 76+ to receive a First Reflection Certificate. Deleting and recreating the subclass requires repeating its trial.
What to collect
 First Reflection Shard ×24
The Giant's Cave (174771, 61840, -4300); Hamrut, Kranrot
- Scene 1
The First New School
From level 40 on your active subclass. After turning in chapter 5 on your main class at level 50+, switch to your first subclass at level 40+ and bind it with Ariel. The level 40+ requirement applies to your active subclass. Choose Track objective, approach the NPC and choose Continue conversation in their quest dialog.
- Location
- Ariel — Rune (44193, -51227, -792)
- Complete when
- Completing this action unlocks the next objective.
- Scene 2
A Familiar Reflection
From level 50 on your active subclass. Investigate the reflection in Forest of Mirrors on your bound first subclass. Choose Track objective and follow the marker. At the marker, open Awakening Diary and choose Examine the site.
- Location
- Forest of Mirrors (137328, 94316, -3426)
- Complete when
- Completing this action unlocks the next objective.
- Scene 3
The First Reflection
From level 60 on your active subclass. Collect shards on your bound first subclass. Choose Track objective and follow the marker. Collect 24 × First Reflection Shard while this objective is active. Then open Awakening Diary and choose Continue.
- Location
- The Giant's Cave (174771, 61840, -4300); Hamrut, Kranrot
- Complete when
- Finish the collection step with Continue. The items remain until chapter turn-in.
- Scene 4
The Right to Be Called a Hero
From level 70 on your active subclass. Read the guidance on earning Noblesse status. Begin the chain with Talien in Aden; Barakiel remains part of its third quest. Open Awakening Diary: Inventory → Quest → double-click the diary. Choose Continue.
- Location
- The companion’s diary; open it anywhere.
- Complete when
- Completing this action unlocks the next objective.
- Scene 5
The First Testimony
From level 76 on your active subclass. Return to Ariel on the same bound subclass at level 76+. Choose Track objective, approach the NPC and choose Continue conversation in their quest dialog.
- Location
- Ariel — Rune (44193, -51227, -792)
- Complete when
- Complete the scene, then choose Complete chapter with Ariel once chapter 12 requirements are met. Branch reward: First Reflection Certificate.
13Another Path, the Same PromiseAfter chapter 5 · subclass 40+ · turn-in 76+
After turning in chapter 5 on your main class at level 50+, select the second subclass branch in the diary. Switch to a different subclass at level 40+, bind it with Embryo and complete its scenes on it. Turn in on the same subclass at level 76+ to receive a Second Reflection Certificate. Both distinct subclasses must still exist for the finale.
What to collect
 Second Reflection Shard ×24
Forest of Mirrors (137328, 94316, -3426); Harit Lizardman, Harit Lizardman Grunt, Harit Lizardman Archer
- Scene 1
The Second New School
From level 40 on your active subclass. After turning in chapter 5 on your main class at level 50+, switch to a different subclass at level 40+ and bind it with Embryo. The level 40+ requirement applies to your active subclass. It must differ from the one bound in the first branch. Choose Track objective, approach the NPC and choose Continue conversation in their quest dialog.
- Location
- Head Instructor Embryo — Ivory Tower (85129, 16195, -4272)
- Complete when
- Completing this action unlocks the next objective.
- Scene 2
The Second Reflection
From level 50 on your active subclass. Collect shards on your bound second subclass. Choose Track objective and follow the marker. Collect 24 × Second Reflection Shard while this objective is active. Then open Awakening Diary and choose Continue.
- Location
- Forest of Mirrors (137328, 94316, -3426); Harit Lizardman, Harit Lizardman Grunt, Harit Lizardman Archer
- Complete when
- Finish the collection step with Continue. The items remain until chapter turn-in.
- Scene 3
The Names Remain
From level 61 on your active subclass. Visit the marked site in Fields of Massacre on your second bound subclass. Choose Track objective and follow the marker. At the marker, open Awakening Diary and choose Examine the site.
- Location
- Fields of Massacre (177621, -22760, -3256)
- Complete when
- Completing this action unlocks the next objective.
- Scene 4
Defend Another's Memory
From level 70 on your active subclass. Protect the record from three successive enemies on your second bound subclass. Choose Track objective and follow the marker. At the marker, open Awakening Diary and choose Start event. Stay nearby; the event lasts up to five minutes.
- Location
- Level 69–70 hunt (168855, -42812, -3268)
- Complete when
- The scene completes automatically after the last enemy. If interrupted, restart the event; your earlier collection is preserved.
- Scene 5
The Second Testimony
From level 76 on your active subclass. Return to Embryo on the same bound second subclass at level 76+. Choose Track objective, approach the NPC and choose Continue conversation in their quest dialog.
- Location
- Head Instructor Embryo — Ivory Tower (85129, 16195, -4272)
- Complete when
- Complete the scene, then choose Complete chapter with Head Instructor Embryo once chapter 13 requirements are met. Branch reward: Second Reflection Certificate.
14Awakening of a CompanionMain class: start 80+, turn-in 80+
Return to Embryo on your main class at level 80 with 100% experience and the third class transfer. Turn in all 11 main chapters and both subclass trial branches (chapters 12 and 13). Keep both distinct subclasses at level 76+ bound in the quest. Complete all four Noblesse quests (241, 242, 246, 247) and obtain Noblesse status. Claim the full kit for your selected S-grade weapon; a crafted weapon is not required for the finale. Keep the Sealed Companion Stone, Awakening Diary and both certificates. Make room in your inventory, choose one agathion and confirm the choice separately. This quest is not repeatable; confirmation removes its quest items and the new stone begins accumulating experience from zero.
Back to chaptersFind the quest NPCs
Use these coordinates to check your destination. Enable your current target with Alt+U.
Leader Anakazel Mid
Gludio
-14814, 123589, -3112Sidereal Archers
Giran
82562, 144211, -3528Alfred Von Helmann
Oren
79399, 52971, -1552Head Instructor Embryo
Ivory Tower
85129, 16195, -4272Jolie
Aden
147454, 21315, -2136Juris
Hot Springs
151238, -112509, -2232Ariel
Rune
44193, -51227, -79204S-grade crafting11 weapon options · materials for your chosen plan
Choose one of 11 S-grade weapon plans before turning in chapter 3. Your confirmed choice remains fixed for the rest of the quest. The quest awards the selected kit’s materials chapter by chapter.
Complete chapter 10’s scenes and turn it in on your main class at level 76+ with your third class transfer completed to receive the remaining materials for your selected kit. In total, the quest awards one crafting attempt’s materials and two recipes: one to learn and one consumed when crafting.
Crafting the weapon requires a dwarf crafter with Create Item skill level 9. This is the crafter’s skill level. Crafting a weapon is not required to turn in chapter 10 or finish the agathion quest.
If you are resuming an older quest with no plan selected, confirm a plan in the diary’s crafting menu first. An already confirmed plan cannot be changed.
The crafting success chance is 60%. An attempt can fail; another free attempt is not guaranteed.
Forgotten Blade
- Crystal: S Grade
- ×211
- Synthetic Cokes
- ×264
- Mithril Alloy
- ×264
- Gemstone S
- ×43
- Enria
- ×132
- Durable Metal Plate
- ×132
- Warsmith's Holder
- ×4
- Forgotten Blade Edge
- ×17
- Recipe: Forgotten Blade (60%)
- ×2
Basalt Battlehammer
- Crystal: S Grade
- ×211
- Synthetic Cokes
- ×154
- Mithril Alloy
- ×154
- Gemstone S
- ×43
- Enria
- ×77
- Durable Metal Plate
- ×308
- Warsmith's Holder
- ×4
- Basalt Battlehammer Head
- ×17
- Recipe: Basalt Battlehammer (60%)
- ×2
Imperial Staff
- Crystal: S Grade
- ×210
- Coarse Bone Powder
- ×242
- Compound Braid
- ×121
- Oriharukon
- ×121
- Gemstone S
- ×43
- Enria
- ×121
- Durable Metal Plate
- ×242
- Warsmith's Holder
- ×4
- Imperial Staff Head
- ×17
- Recipe: Imperial Staff (60%)
- ×2
Angel Slayer
- Crystal: S Grade
- ×211
- Synthetic Cokes
- ×264
- Mithril Alloy
- ×264
- Gemstone S
- ×43
- Enria
- ×132
- Durable Metal Plate
- ×132
- Warsmith's Holder
- ×4
- Angel Slayer Blade
- ×17
- Recipe: Angel Slayer (60%)
- ×2
Shining Bow
- Crystal: S Grade
- ×212
- Synthetic Cokes
- ×75
- Mithril Alloy
- ×375
- Gemstone S
- ×43
- Enria
- ×75
- Durable Metal Plate
- ×150
- Warsmith's Holder
- ×4
- Shining Bow Shaft
- ×17
- Recipe: Shining Bow (60%)
- ×2
Dragon Hunter Axe
- Crystal: S Grade
- ×214
- Synthetic Cokes
- ×124
- Mithril Alloy
- ×248
- Gemstone S
- ×43
- Enria
- ×62
- Durable Metal Plate
- ×248
- Warsmith's Holder
- ×4
- Dragon Hunter Axe Blade
- ×17
- Recipe: Dragon Hunter Axe (60%)
- ×2
Saint Spear
- Crystal: S Grade
- ×214
- Synthetic Cokes
- ×124
- Mithril Alloy
- ×248
- Gemstone S
- ×43
- Enria
- ×62
- Durable Metal Plate
- ×248
- Warsmith's Holder
- ×4
- Saint Spear Blade
- ×17
- Recipe: Saint Spear (60%)
- ×2
Demon Splinter
- Crystal: S Grade
- ×211
- Synthetic Cokes
- ×154
- Mithril Alloy
- ×154
- Gemstone S
- ×43
- Enria
- ×77
- Durable Metal Plate
- ×308
- Warsmith's Holder
- ×4
- Demon Splinter Blade
- ×17
- Recipe: Demon Splinter (60%)
- ×2
Heaven's Divider
- Crystal: S Grade
- ×212
- Synthetic Cokes
- ×146
- Mithril Alloy
- ×292
- Gemstone S
- ×43
- Enria
- ×146
- Durable Metal Plate
- ×146
- Warsmith's Holder
- ×4
- Heavens Divider Edge
- ×17
- Recipe: Heavens Divider (60%)
- ×2
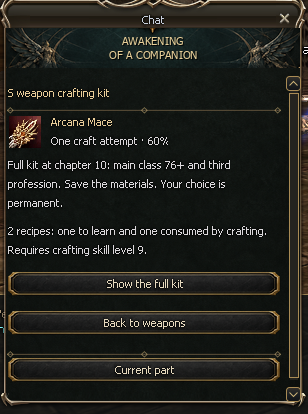
Arcana Mace
- Crystal: S Grade
- ×211
- Synthetic Cokes
- ×154
- Mithril Alloy
- ×154
- Gemstone S
- ×43
- Enria
- ×77
- Durable Metal Plate
- ×308
- Warsmith's Holder
- ×4
- Arcana Mace Head
- ×17
- Recipe: Arcana Mace (60%)
- ×2
Draconic Bow
- Crystal: S Grade
- ×212
- Synthetic Cokes
- ×75
- Mithril Alloy
- ×375
- Gemstone S
- ×43
- Enria
- ×75
- Durable Metal Plate
- ×150
- Warsmith's Holder
- ×4
- Draconic Bow Shaft
- ×17
- Recipe: Draconic Bow (60%)
- ×2
05Two reflections: subclassesAfter chapter 5 · start on subclasses at 40+ · turn in at 76+
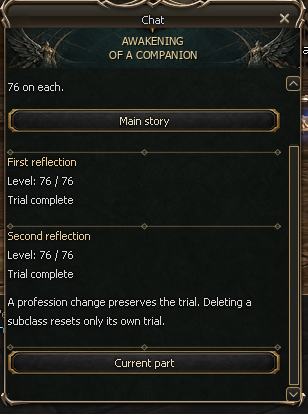
Turning in chapter 5 on your main class at level 50+ unlocks chapters 12 and 13. Follow these branches in either order, alongside the main story. Their level 40+ and 76+ requirements refer to the active subclass.
- Switch to a subclass at level 40 or above and bind it to the first reflection.
- On the bound subclass, collect 24 × First Reflection Shard and reach level 76. Turn in the branch to Ariel while that subclass is active.
- Bind a different subclass at level 40+ to the second reflection. Collect 24 × Second Reflection Shard, reach level 76 and turn in the branch to Embryo while that subclass is active.
Collect materials and turn in each branch on its bound subclass. Keep both subclasses and both testimonies until the finale. Deleting and recreating a subclass requires repeating its trial.
06Noblesse for the finaleAll four quests and Noblesse status
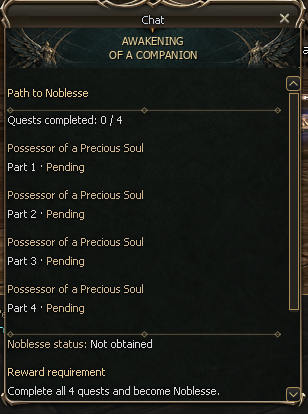
For the final chapter, complete the entire Possessor of a Precious Soul quest chain and obtain Noblesse status. The status alone does not replace the completed quests.
Begin the chain with Talien in Aden. Use the Alt+U journal for its next objectives; Barakiel belongs to the third part.
- Possessor of a Precious Soul — 1 (241)
- Possessor of a Precious Soul — 2 (242)
- Possessor of a Precious Soul — 3 (246)
- Possessor of a Precious Soul — 4 (247)
Barakiel remains part of the regular Noblesse chain. No separate raid seals are required for the agathion quest.
Finale: choose your companion
This quest can be completed once. Choose one agathion, then confirm the reward separately. Your companion starts with 0 experience.
Before speaking to Embryo
- Turn in all chapters 1–13: main-story chapters 1–11 and both subclass trial branches, chapters 12 and 13.
- Main class: level 80 with 100% experience and all three class transfers.
- Both bound subclasses still exist, are different from each other and are at level 76+; both testimonies have been obtained.
- Complete the Noblesse chain 241 / 242 / 246 / 247 and obtain Noblesse status.
- Claim all materials and recipes from your selected S-grade weapon kit.
- Keep Sealed Companion Stone, Awakening Diary and both testimonies on your character.

Agathion Stone: Fiona
Restores HP

Agathion Stone: StarAngel
Restores MP

Agathion Stone: Righteous
Restores CP

Agathion Stone: Lindvior
Increases physical and magical defence

Agathion Stone: Valakas
Increases physical and magical attack